Exploring Streamlit UI
Premise
This week I’ve been looking at Streamlit and how it can help me build user interfaces quickly. I’d like to be able to easily put together demos and UIs for internal tools.
Developing a web UI typically requires a web developer with proficiency in Javascript/Typescript, HTML, CSS, and more often than not one of the prominent frontend frameworks like React, Vue, or Angular - and their respective tooling and build chains!
This can prove a significant challenge if you are a backend developer or a data scientist, without prior frontend experience or time to invest.
This is where Streamlit comes in.
Streamlit is a Python libarary that lets you compose web UIs using a library of pre-built components, directly in your Python application. It looks like a great fit for small projects and in-house apps.
Objective
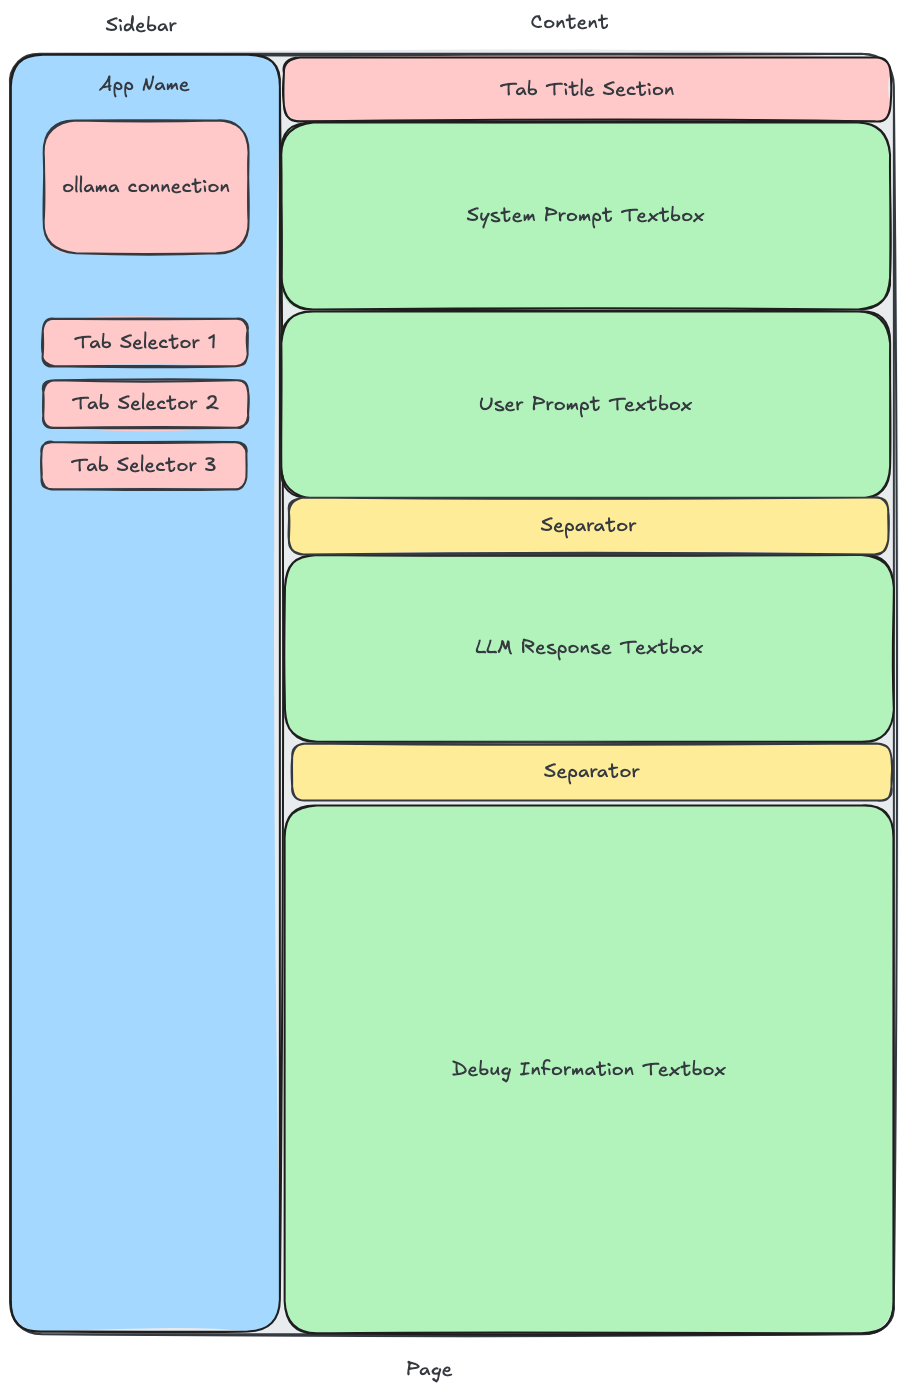
Let’s build something. Here’s roughly what I want my UI to look like:
- A sidebar
- App title
- Connection strings
- Connection status
- Function selector
- Function: LLM Query
- System Prompt
- User Prompt
- Response Area
- Debug box?
- Function: Document Analysis
- Upload file
- File preview
- Document summary
Rough sketch:
Streamlit basics
Before we build our app, let’s have a look at some Streamlit basics.
Have a look at the Streamlit API reference docs . This will give you a good idea of the kinds of elements and components available .
The core concept here is that you declare your UI using simple objects like st.write, st.markdown, st.header, st.code.
Define layout with things like st.columns, st.container, st.sidebar.
Compose more advanced UIs with st.navigation, st.page, st.area_chart, and more.
You get the picture.
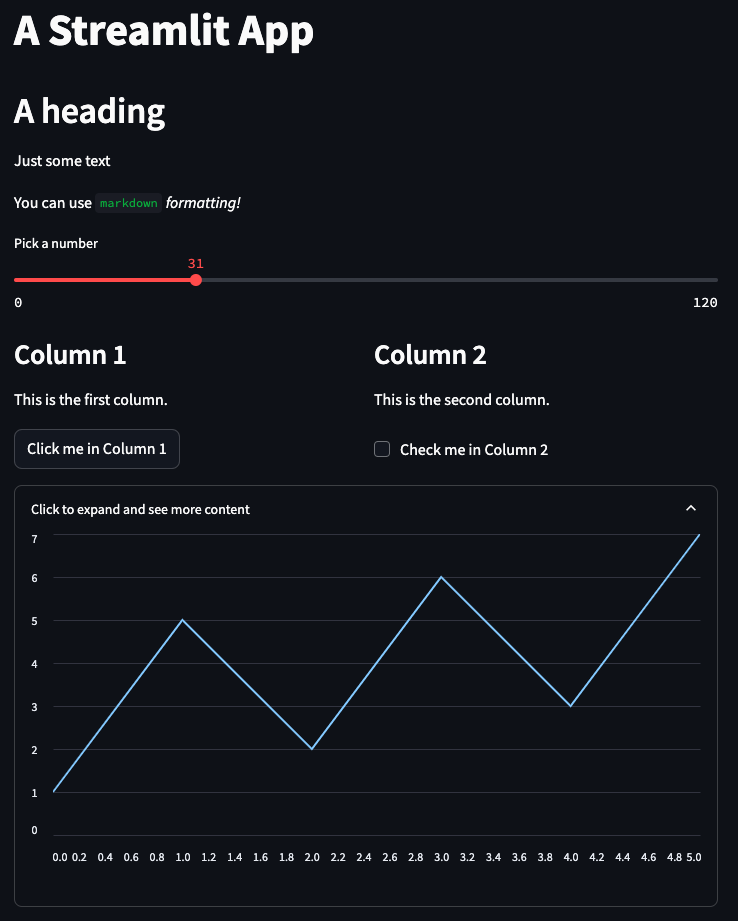
Here is a very basic UI defined with Streamlit:
import streamlit as st

# Display a large title
st.title("A Streamlit App")

# Create heading
st.header("A heading")

# We can add text using st.write() or st.markdown().
st.write("Just some text")
st.markdown("You can use `markdown` *formatting!*")

# A slider
age = st.slider("Pick a number", 0, 120, 31) # min=0, max=120, default=31

# Columns help arrange elements
col1, col2 = st.columns(2) # Create two columns

# You can add elements to each column using 'with col1:' and 'with col2:'.
with col1:
    st.subheader("Column 1")
    st.write("This is the first column.")
    st.button("Click me in Column 1") # A button in the first column

with col2:
    st.subheader("Column 2")
    st.write("This is the second column.")
    st.checkbox("Check me in Column 2") # A checkbox in the second column


# You can create section that can be expanded.
with st.expander("Click to expand and see more content"):

    # You can even create charts and graphs.
    st.line_chart({"data": [1, 5, 2, 6, 3, 7]}) # You can put any Streamlit element inside an expander
Which will produce:
Application
Now, let’s build something a bit more complex.
For this project, I’ve leveraged LLMs to help me generate parts of the logic. Code generation is a hotly debated topic right now. The tl;dr is that it works for simple use-cases, but with some tinkering. I’ll write about using LLMs for code generation in depth at a later date. I think it’s an area with tremendous potential when done right.
Application code:
import streamlit as st
from ollama import Client
import PyPDF2 # for PDF conversion
import os # Make sure this is at the top of your file
# Initialize session state for Ollama configuration and client
if 'ollama_host' not in st.session_state:
st.session_state.ollama_host = "http://localhost:11434"
if 'ollama_model' not in st.session_state:
st.session_state.ollama_model = "llama3.2"
if 'ollama_client' not in st.session_state:
st.session_state.ollama_client = None
if 'connection_status' not in st.session_state:
st.session_state.connection_status = "Not Connected"
if 'last_successful_config' not in st.session_state:
st.session_state.last_successful_config = None
def initialize_ollama_client(host, model):
# Try connection to ollama
try:
client = Client(host=host) # Create a connection
client.show(model) # Get a list of available models
return True, None # If we get here, both connection and model verification succeeded
# This will raise an exception if either:
# 1. The connection fails
# 2. The model doesn't exist
# And will return the error string.
except Exception as e:
return False, f"Unexpected error: {str(e)}"
def update_connection():
"""
Update the Ollama client connection based on current configuration.
Updates session state with connection status and client instance.
"""
success, error = initialize_ollama_client(
st.session_state.ollama_host,
st.session_state.ollama_model
)
if success:
st.session_state.ollama_client = Client(host=st.session_state.ollama_host)
st.session_state.connection_status = "Connected"
st.session_state.last_successful_config = {
'host': st.session_state.ollama_host,
'model': st.session_state.ollama_model
}
else:
st.session_state.ollama_client = None
st.session_state.connection_status = f"Connection Failed: {error}"
def generate_ollama_response(user_prompt, system_prompt):
"""
Generates a response from Ollama based on user and system prompts.
Utilizes the Ollama client and model from the session state.
"""
if not user_prompt:
st.warning("Please enter a prompt before generating.")
return
try:
# Initialize response container
response_container = st.empty()
full_response = ""
# Generate streaming response using existing client
for chunk in st.session_state.ollama_client.generate(
model=st.session_state.ollama_model,
prompt=user_prompt,
system=system_prompt if system_prompt else None,
stream=True
):
if 'response' in chunk:
full_response += chunk['response']
# Update the response container with accumulated text
response_container.markdown(full_response)
# Display debug information
with st.expander("Debug Information"):
st.code(
f"Model: {st.session_state.ollama_model}\n"
f"Host: {st.session_state.ollama_host}\n"
f"System Prompt Length: {len(system_prompt)}\n"
f"User Prompt Length: {len(user_prompt)}"
)
except Exception as e:
st.error(f"An error occurred while generating: {str(e)}")
# If we get an error, try to reconnect
update_connection()
def read_document_content(uploaded_file):
"""
Reads the content of the uploaded document based on its file extension.
Supported extensions: TXT, PDF, MD, and various code files.
"""
file_extension = os.path.splitext(uploaded_file.name)[1].lower() # Get file extension
text_extensions = [".txt", ".md", ".js", ".py", ".cs", ".go", ".html", ".css", ".xml", ".json"] # Add file extensions here, stick to text-only files.
if file_extension in text_extensions:
try:
return uploaded_file.read().decode("utf-8")
except Exception as e:
st.error(f"Error reading text-based content: {e}")
return None
elif file_extension == ".pdf":
try:
pdf_reader = PyPDF2.PdfReader(uploaded_file)
text = ""
for page_num in range(len(pdf_reader.pages)):
page = pdf_reader.pages[page_num]
text += page.extract_text()
return text
except Exception as e:
st.error(f"Error reading PDF content: {e}")
return None
else:
st.warning(f"Unsupported file type. Please upload TXT, PDF, MD, or code files ({', '.join(text_extensions[2:])}).") # Updated warning message
return None
# Web page config
st.set_page_config(layout="wide")
# Sidebar area
with st.sidebar:
st.title("LLM Toolbox")
st.divider()
# Ollama configuration with connection management
new_host = st.text_input(
"Ollama Host",
value=st.session_state.ollama_host,
help="Example: http://localhost:11434"
)
new_model = st.text_input(
"Model Name",
value=st.session_state.ollama_model,
help="Example: llama3.2, phi4, deepseek-r1"
)
if st.button("Connect"):
st.session_state.ollama_host = new_host
st.session_state.ollama_model = new_model
update_connection()
# Display connection status
status_color = "green" if st.session_state.connection_status == "Connected" else "red"
st.markdown(f"Status: :{status_color}[{st.session_state.connection_status}]")
st.divider()
tab_selection = st.radio(
"Functions",
["Query", "Document Summary"],
key="tab_selector"
)
st.divider()
# Main content area - based on selected tab
if tab_selection == "Query":
st.header("Query")
if st.session_state.ollama_client is None:
st.warning("Please establish a connection to Ollama first using the sidebar.")
else:
# System prompt input
system_prompt = st.text_area(
"System Prompt",
height=150,
value="You are a helpful AI assistant.",
help="Provide context or instructions for the model"
)
# User prompt input
user_prompt = st.text_area(
"User Prompt",
height=150,
help="Enter your message here"
)
# Generate button
if st.button("Generate Response"):
generate_ollama_response(user_prompt, system_prompt) # Call the function here
elif tab_selection == "Document Summary":
st.header("Document Summary")
if st.session_state.ollama_client is None:
st.warning("Please establish a connection to Ollama first using the sidebar.")
else:
# File upload section
uploaded_file = st.file_uploader(
"Upload your document",
type=[".pdf", ".txt", ".md", ".js", ".py", ".cs", ".go", ".html", ".css", ".xml", ".json"], # Accepted formats
help="Supported formats: .pdf, .txt, .md, .js, .py, .cs, .go, .html, .css, .xml, .json"
)
if uploaded_file:
document_content = read_document_content(uploaded_file) # Use the function to read content
if document_content: # Check if content was successfully read
# System prompt for document summary
system_prompt = "You are a document summarization expert. Please provide a concise and accurate summary of the document."
# User prompt (instruction + document content)
user_prompt = "Analyze this document and produce an accurate and concise summary:\n\n" + document_content
st.subheader("Document Content Preview:")
st.text_area("Document Preview", value=document_content, height=200)
if st.button("Generate Summary"):
generate_ollama_response(user_prompt, system_prompt)
# Error message is handled inside read_document_content now
else:
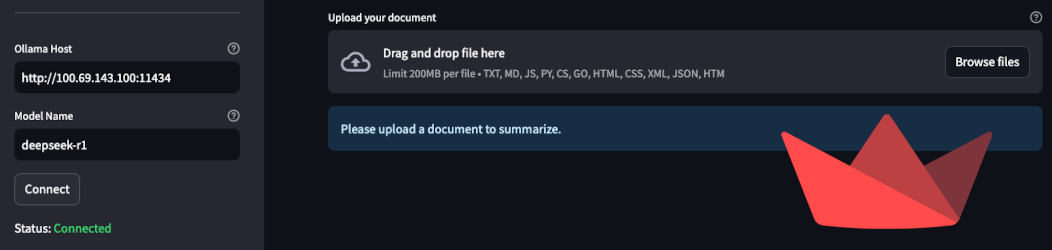
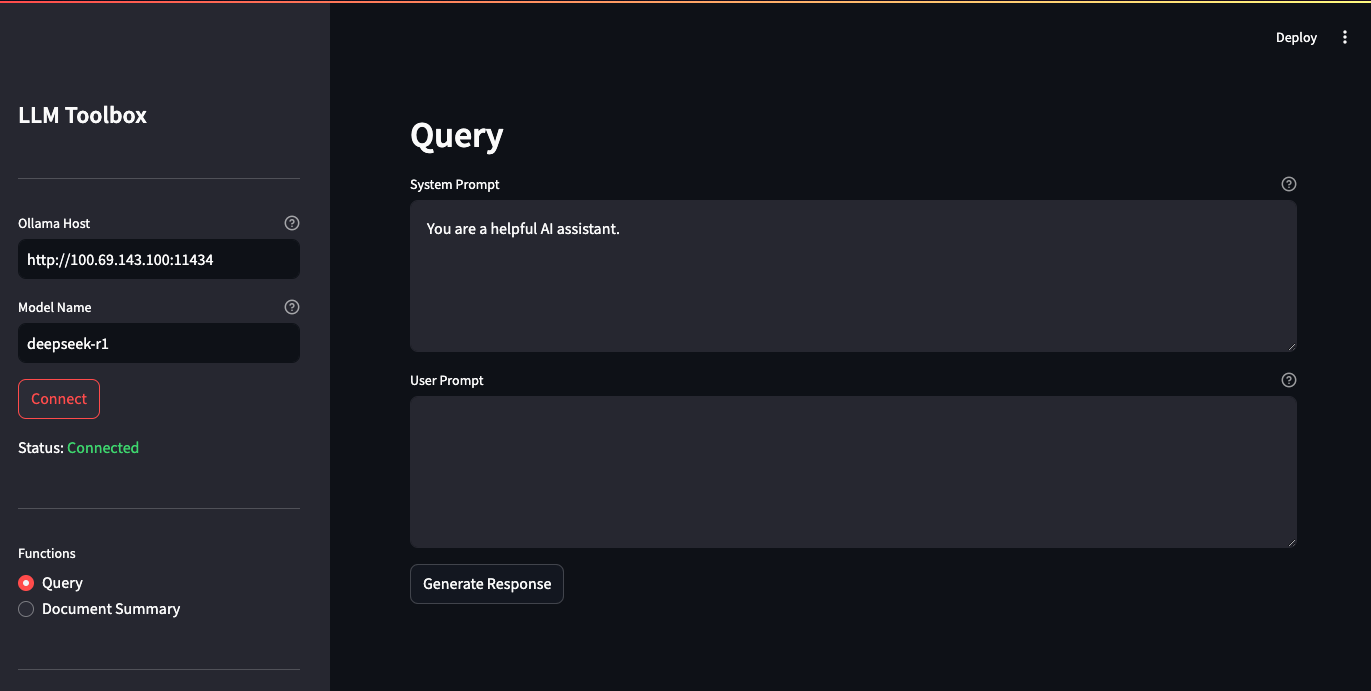
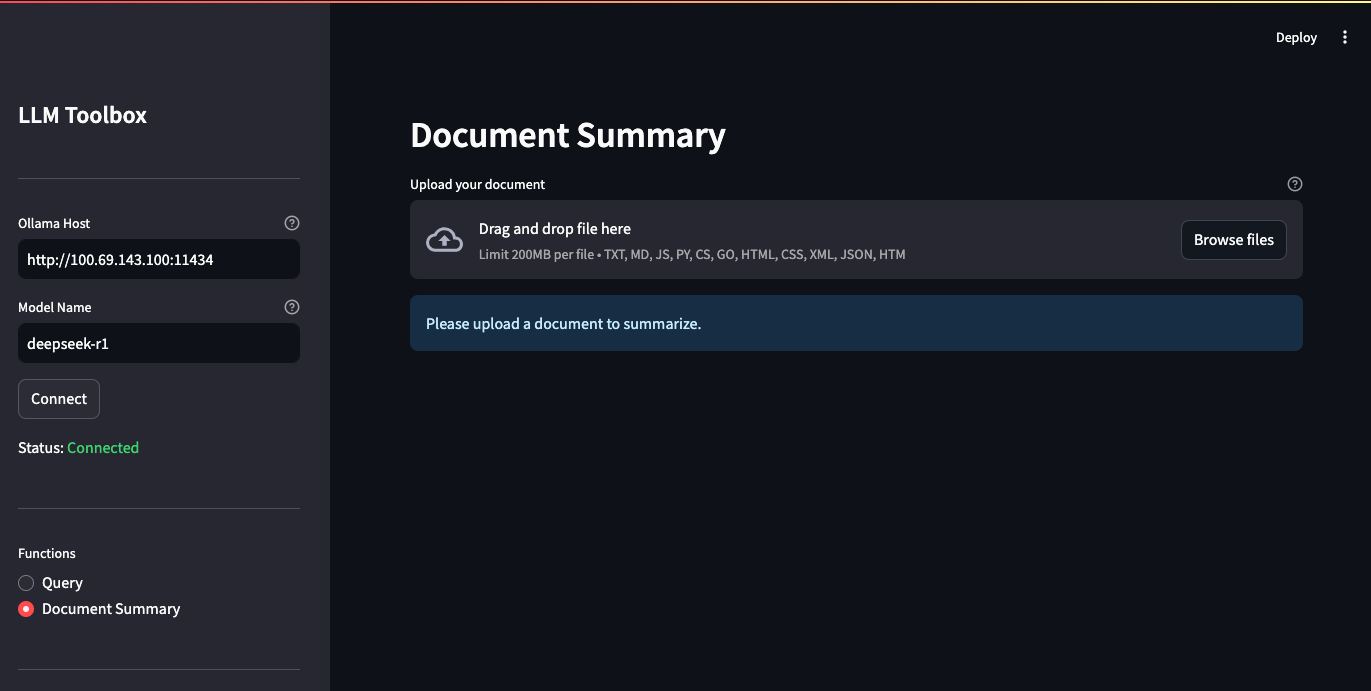
st.info("Please upload a document to summarize.")App screenshots
Limitations and omissions
- There is not much in terms of error handling logic.
- Document summary can only ingest txt, pdf, markdown, and a handful of other text-only files.
- Large PDF files dont always work.
- Application is not aware of model capabilities.
- This means that if you try to feed an image to a model that is not multi-modal, it will fail.
- Uploaded files are not converted into markdown or normalized. Some models may not be able to parse them.
- No memory system, the LLM wont remember previous interactions.
- Other weird and unexpected behaviors.
Tools
- Software
- Python 3.12 (newer will probably work)
- Streamlit
- ollama
- Popular LLM models:
Setup
If you’d like to spin up this app yourself.
#     Open a Terminal


#     1. Download a model, skip if you already have one
ollama pull llama3.2


#     2. Start ollama server
ollama serve


#     Open another terminal, leave the other one running


#     3. Clone repo from terminal, or download via web
git clone https://github.com/MRKups/streamlit-example-1.git


#     4. Navigate to project directory
cd streamlit-example-1


#     5. Create a Python virtual environment, run one or the other
python3 -m venv .venv      # macOS/Linux
python -m venv .venv       # Windows


#     6. Activate your environment, run one or the other
source .venv/bin/activate  # macOS/Linux
.venv\Scripts\activate     # Windows


#     7. Install Python project dependencies
pip install streamlit ollama pypdf2


#     8. Run streamlit app
streamlit run streamlit-example-1.py
Tips
- Access the app at http://localhost:8501/
- If you dont have git installed, you can download from web
- Use
python -m venv .venvifpython3doesn’t work on Windows. - Activate the virtual environment in the terminal where you’ll install the packages and run Streamlit.
source .venv/bin/activateon macOS/Linux..venv\Scripts\activateon Windows.
- The
ollama pullcommand downloads models, ollama catalog - Run
ollama servein a separate terminal and keep it running while using the Streamlit app.
Closing remarks
Streamlit is a neat library that adds a lot of value. Plenty of built-in elements to choose from and an active community developing new components.
I’m going to build more thing with it!